Showing posts with label carpentry. Show all posts

Saturday, August 16, 2008

LR/DR Mega-Update: Week 13- cleared for closure!

Well folks, we may suck at blogging but we're getting the hang of this renovation stuff. Finally... got that second inspector's signature we've been waiting for! Just in time for us to go away for vacation.. Ah well, we hoped to have the plasterers in and walls up before heading to the shore, but we'll relax on the beach knowing its ready to go when we get back. In fact we'll probably be finishing up the insulation over Labor Day weekend. The rest of this post i actually started last week but blogger didn't feel like publishing it. I'll just leave it here below. I cant believe we thought this project would only take until mid July. Ha! Also this week, we had insulation contractors come and install blown-in cellulose to the second floor apt and our first floor bedrooms. They worked from the exterior, and except for a trampled flower bed, you wouldn't even know they were here. Price was reasonable too. I think if we knew how easy insulating like that was, we might not have talked ourselves into the gut job!

***Draft Post from 8/16***
This blogging thing should really be done every couple of days so it doesn't all pile up and become unwieldy, right? Kinda like cleaning, or weeding the garden, or any of the other myriad chores of life.


Well, here goes. So much has happened i wont try to separate it into many posts. But i will do some separate detailed 'Lessons Learned' how-to posts on tasks that gave us particular headaches.

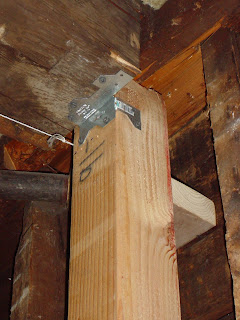
In short, we have got the building inspector rough sign off, and awaiting the electrical inspector (Monday) but then, we can bring in the plasterers and Close'er up!!!!!! Let me try to take it back in time. Here is how it looks right now: All three of the ceiling "Sectors" are framed and level, and secured to the joists with hurricane ties or L brackets: Leveling out the ceiling frame was by far one of the hardest parts. It took a whole lot of measuring and figuring. We were trying to squeeze out every bit of ceiling height we could so that made life harder. Handywoman had to make good use of her chiseling techniques to notch out parts of the frame in Sector 2. We found a 4" difference in level from the back to the front of the room! We also found that the best way to establish the level line was also the cheapest- a 50-cent string level. See future "Lessons Learned"-Level post for details. We also had to keep reminding ourselves that it didn't have to be level to the nearest 1/16th! Handywoman was overengineering for 1/8th; the plasterer had told me 1/2", so we compromised on a goal of 1/4".
Here are a whole bunch of pics from the project:

Inspector RayRay stretches after a long day on the job:


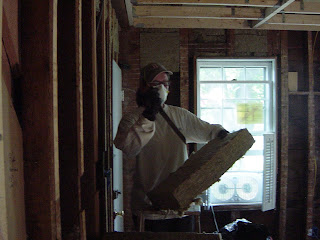
Psycho Insulator! Cutting mineral wool for ceiling with my best bread knife.

Leveling the ceiling in 'Sector 3' - the newer portion of the house. Here we used 2x4s as mini sisterboards nailed/screwed into the old joists. This was alot easier than the other sectors!:


The beautiful new pipe chase frame by Handywoman:


Among the many great lessons we learned from HW during this process was the thrifty but very smart practice of saving all of your scrap wood cause you never know when you might want to re-use it- plus its Green- we sure wish we had saved some of the things that went into our Dumpster.. but we did save and reuse a bunch, especially scraps of the new wood we bought. Another future post I plan..regarding old vs. new wood...

Pocket Door stud wall (entryway to the future 007 style hidden minibar), also all by HW:


This space was formerly the kitchen pantry. When we did that renovation 2 years ago, we walled off the pantry in order to maximize counterspace, with the thought in mind of breaking into the space during the dining room renov.. The Pocket Door Kit..was..maybe one of the biggest headaches of all. With the collective brainpower of 5 college degrees, plus the power of Google we could not for the life of us figure out the #@$!!& directions! Again, stay tuned for a Lessons Learned on Pocket Door installation...

More details to come soon...well, after vacay.. here's one more cute pic to end with:

Monday, July 7, 2008

Living/Dining Room Renov.- Tasks 1 &2 , Done!


Well, despite my efforts to sabotage the project,we managed to get the structural repairs completed over the holiday weekend. Thanks mainly to Handywoman's mad skills with the circular saw. She wields that thing like a ice sculpture artist with a chainsaw. More power to her. I'm still scared of that thing.

Mr. LL and I spent a miserable couple hours stuffing rock wool insulation up between the ceiling joists in hot sticky weather; but the feeling of accomplishment and momentum was certainly worth it.

Not to mention future money saved on heat, and sound dampening of upstairs footsteps (more on that next time). Here's some photos of the results so far:

In the overview photo above you can see the new rock wool ceiling insulation and the beginnings of our new dropped ceiling frame on the left.


Our insulation gets the Leo seal of approval for coziness:


Although he's not too happy now that his Fortress of Solitude has disappeared and he is reduced to hanging out on the floor with Chip and the dogs.


Here are some photos of the structural repairs... The Plumbers Special:


The south wall support (the one I measured 10 inches short at first):


And the other North wall support. This one is opposite the support shown above. Together these supports sort of frame the "newer" portion of the house that was added on.

These new supports will bump out into the room, which is sort of weird. But we've decided to embrace them as a restoration of one of the house's "original details". Um, that being..you know, structural support..

Carpentry for Dummies...

You know the saying- "measure twice (or thrice), cut once". Hell, I know the saying. But knowing and doing are two different things. Yeah, I screwed up. Pretty big..well not in the sense of -cut a hole in a gas line- big, but my screw up was a three-parter. Triple play, -set us back half a day-, big.

Just dumb. Here goes:

Part 1- Before we went to buy lumber, I had the job of measuring how long our 4x4 structural supports needed to be. Yes, 8 ft finished length, but we'd need 10'ers to cut down to extend to the joists and the sill. Realized this AFTER getting home with our 3 new 8 ft 4x4s.

Part 2- Headed out to a real lumberyard to remedy Part 1 and buy 3 x 10'ers. Tried my best to sight the wood and pick out straight pieces without major defects. Apparently I was distracted by the young man chatting with me at the lumberyard. Upon arriving home and laying them out on the floor, noticed one of them was as bowed as cowboys legs. Just un-usable. Strike two.

Part 3- Here's the best part. I had the job of measuring the maximum length of the support so we could cut down the 4x4 and notch it. My brain and motor skills were apparently so busy making sure to measure to the nearest 16th along a perfect plumb line, that I neglected to stick the tape down into the subfloor to the sill and instead measured to the finished floor. Handywoman (who now double checks all my measurements) then meticulously notched both top and bottom of the post to make it fit like a glove. When at last we triumphantly lowered the post into the floor.. Yep, about 10 inches short.

How pathetic am I?? We all laughed pretty hard but I wanted to crawl down into that hole in the subfloor and die.

Monday, June 23, 2008

Moving Forward, Stumbling Back..

So, ever so slowly, we're finally moving into construction phase. Let me play some catch up here. So, the building inspector took a look at our mash-up of a house and mumbled in his thick Boston accent that a we would have to get a licensed "ahk-itect" or structural engineeah to take a look and write up some kind of plan to address things like this- what we like to call "The Plumber's Special":

about 7 inches of the exterior 8x8 rim joist hacked away to route a steam pipe, leaving the central beam ("the Beast") notched in and supported by only about an inch or so of structure. Now of course we were planning to shore up things like the Plumbers Special anyway. The Good News part-- is that Landladylike happens to work in an engineering firm so could fairly easily get a kind coworker with a license to help us out. So, while the process of getting my P.E. friend out to the house, getting a plan write up from him, and getting the inspector's buy-in set us back several weeks, it only set our checkbook back the cost of a Home Depot thank you gift card! In the meantime while waiting for the structural go-ahead, we set about trying to hire someone with carpentry experience who would be willing to work with us instead of just handing over the whole job to a contractor. You see, Mr.LL does rough electrical work; I do the plumbing, but carpentry is probably the one area of home repair that we have close to zero confidence in ourselves. Not to mention lacking certain important tools such as a table saw. So several friends/acquaintenances were contacted...but no takers... Finally, just when LL was sinking into despair....the goddess of DIY shone upon us and it was Handywoman to the rescue!!Woo hoo!

She offered her assistance, tools and know-how for a modest fee. She promised to try not to OverEngineer the project. We promised not to sue if we cut our toes off with her saw. We agreed the overarching principle was to preserve our friendship at all costs. Then she and I set about together to overthink the heck out of the project while Mr. LL patiently waited for us to argue our way back to the original plan. Most specifically the question of how to build a level ceiling from a jumble of 1800s wood beams occupied our brains. A necessary task so that the plasterers will be happy when they come to hang blueboard. Since my brother (a contractor in California) used 2x8 wood sister boards bolted to the joists in our kitchen renovation, this method came to my mind first. And we actually got as far as loading up our cart at H.Despot with 12 x 12' 2x8's. It made good enough sense in the kitchen, with a space about half the size of the living/dining room. And without any joists or posts that had been mutilated. But looking at this monstrous pile of lumber and imagining attaching it to our (already structurally compromised) joists gave us all pause. We had also considered using lightweight steel studs as sisters, following this method However, at least the first plasterer we talked too scoffed at the idea of using steel- "flimsy stuff suitable only for commercial or tear-downable work". After a considerable amount of research, we came to the consensus that while the steel solution might be easier and more elegant; there were too many uncertainties (where to buy, what to buy, how to work with, how to attache recessed lighting) for our liking.. Plus, in a tradition-driven Beantown, its a safer bet that your Inspector and the other trades will be more comfortable with tried and true. So, we plan to build a 2x4 frame suspended from the joists. The drawback is we'll lose two inches of height. The plus (I think) is we'll lose some decibels of sound transmission through the creaky floor above. That, plus the mineral wool soundproofing insulation should be a big improvement! Next post...Carpentry 101..a lesson in measure thrice, cut once...